Book Marketing 101: How to Create an Author Website in WordPress
By Elizabeth Mays |
I’m about to save you thousands of dollars. This is the step-by-step I keep meaning to write for my writer colleagues, to save them from being dependent on someone else to create their author website/blog.
I plan to make this a series of posts on the easiest / fastest / cheapest ways to create a modern-looking author website even if you are less than technical right now (as many of the best writers I know are).
As I tell these friends, if you’re not technical yet, you need to get at least a smidge more comfortable with digital technology, or you cannot take control of your brand in the way you need to to market your book. This post presumes that you are willing to dip at least a toe into the waters of digital technology, in order to reap great rewards in the forms of cost savings and control.
There are so many ready-to-go website creation solutions nowadays for the basic type of website an author needs, it doesn’t make sense to spend thousands having someone design something from scratch for you, especially when you’re starting out. That can eat into your book profits quickly.
Sure, there are some parts of your Web design it may make sense to pay for later–customizing your theme, for instance–but generally it makes sense to spend the money on the parts you can’t do yourself, not to manually rebuild the underlying infrastructure that already exists.
Let’s start with a fundamental premise: As an ordinary author, I believe you can (and probably should) create your own website.
Why? Not only does DIY lower your overhead as an indie author, but it also gives you control, and control of your website is important. Your author website is not a static thing you create once–if you want to be successful marketing your book, you’ll need to update it regularly. Your website also becomes a platform from which you’ll be blogging frequently to boost your discoverability and broaden your audience.
I know too many authors who don’t know how to update the website someone else created for them, can’t reach the person who created it for them, have difficulty updating a site that was overly customized down the road, don’t want to pay for constant changes or content, and/or can’t remember how to access their site.
So you don’t want your basic site to be dependent on someone else (whether that’s a professional who will charge you or a family member who will drag their feet) for every change.
Since you’re going to be updating your website frequently, you need to build it on a platform that you can understand and use. One of the best choices for this is WordPress. (I get nothing by recommending WordPress, and also personally work in may other platforms–Drupal, Squarespace and others.) But having created and/or maintained websites on many platforms, generally, WordPress is the first solution I recommend to authors who aren’t super tech-savvy–here’s why:
- It’s really easy to create and maintain a website using WordPress. You can do it in less than an hour once you know what you’re doing.
- Unlike other user-friendly solutions, WordPress does not charge you a monthly fee. Creating a site at WordPress.com is free. Even if you register a domain through WordPress (which you should so that your site URL is you.com), it’s only $18 / year. Compare that to $25/month for similar user-friendly platforms, and that’s a big savings.
- Most of the features people expect from a website or blog nowadays are either baked in or easy to integrate into WordPress.
- On a self-hosted WordPress install, your site features become highly expandable with the addition of simple plug-ins.
One point of confusion to clear up. There are two types of WordPress that you can use. If you’re less technical and have either no website at all yet, or a website you cannot access or update, I suggest you use WordPress.com (and we’re going to focus on this method in this post). If you’re already somewhat digitally savvy and just haven’t done this yet, you should consider a self-hosted install, which will take more time to customize, but give you access to build more features using plug-ins.
Once installed, the dashboards of both interfaces look and function almost the same. The difference is that WordPress.com offers a wide selection of themes that you can instantly apply to your site. Again, that’s great for non-designers, beginners and anyone wanting an instant website.
A self-hosted install offers fewer built-in theme choices, requires buying the right type of hosting elsewhere and for you to be somewhat tech-savvy to get the shell up and running. If you can learn these things, it’s a better choice because it features the ability to integrate third-party plugins that add advanced functionality, such as free ebook downloads, email lead capture popups and more.
Let’s assume, for the purposes of this article, that you’re going to use WordPress.com for your initial website (easiest, fastest, most basic) and perhaps become a level two WordPress ninja later. If you’re already using Pressbooks for your book, you have the skills you need to create an author website this way.
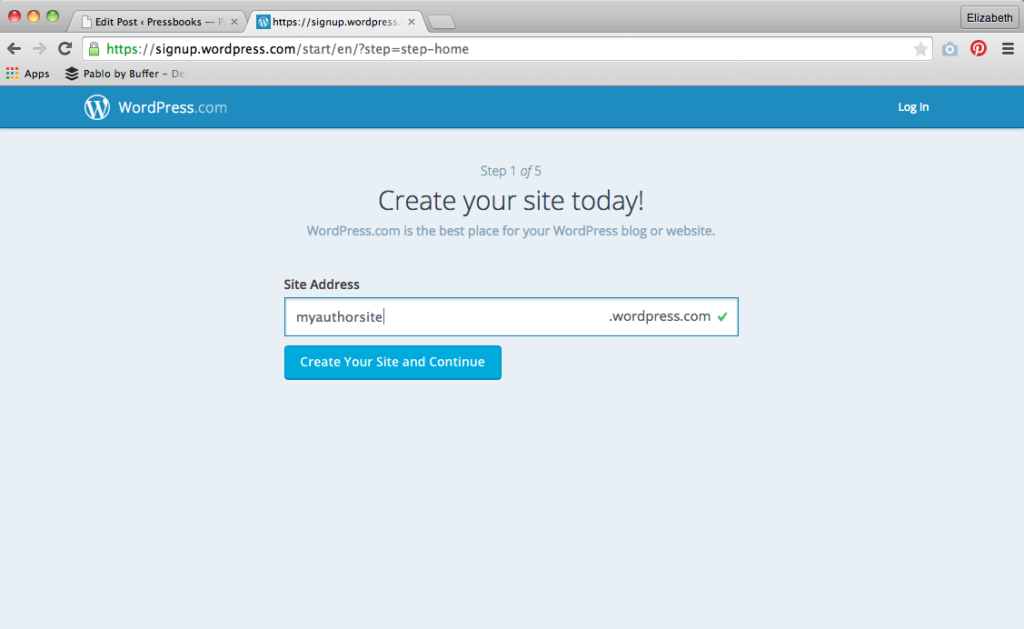
Step 1: Go to WordPress.com
It will ask you to create a site name. For now, use your author name. This will create a subdomain on WordPress where you can build your site. Ultimately, a subdomain is the mark of an amateur–you’ll want to “mask” this domain by purchasing yourauthorname.com through the WordPress upgrade store and pointing to that as your primary domain. You can do this in the setup process, or wait for later. Choose the free plan in the prompts for now. WordPress will also ask you to confirm your email address.
Step 2: Choose a Theme
After obtaining your personal information, WordPress will next prompt you to start a post, choose a theme or customize your site. I suggest starting with the theme. There are numerous free themes to choose from, and you can change your theme instantly or upgrade to a premium theme later. You won’t lose your content when you do this–it will just show up differently. So for now, just choose the theme you like the most of the options. Click “demo” to see how a theme handles elements like posts, pages and categories, and “activate” to apply it to your site. Once again, this is a non-permanent decision that you can easily change later. When you change the theme, your content positioning will adapt based on how the new theme handles it.
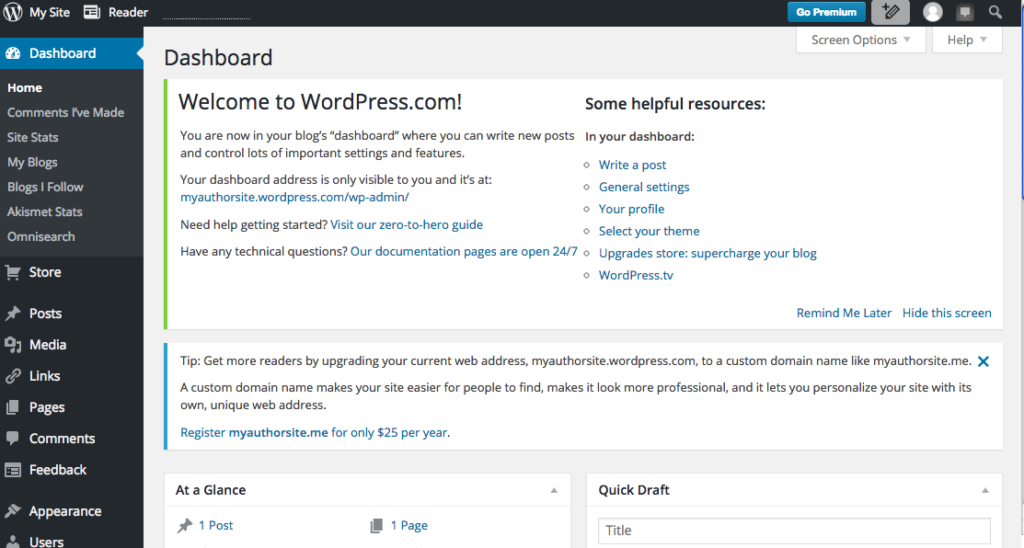
Step 3: Go to the WP-Admin Screen
This is your dashboard, the place to which you’ll return again and again to write posts, create pages and customize how things display on your site.
Step 4: Create the Main Pages
Grossly simplified, Pages are static pages of your website that usually become part of your navigation menu. Posts are more like blog posts, which won’t be part of your navigation and will show for a time, then be bumped down by new posts. As an author you’ll want main pages to include things like your author bio, your books, ways the media can contact you, etc. You have some control over how these show in the navigation bar (though how the nav bar itself displays–side, top, etc.–is controlled by the theme you chose.) Go to Appearance / Menus to set your desired navigation hierarchy.
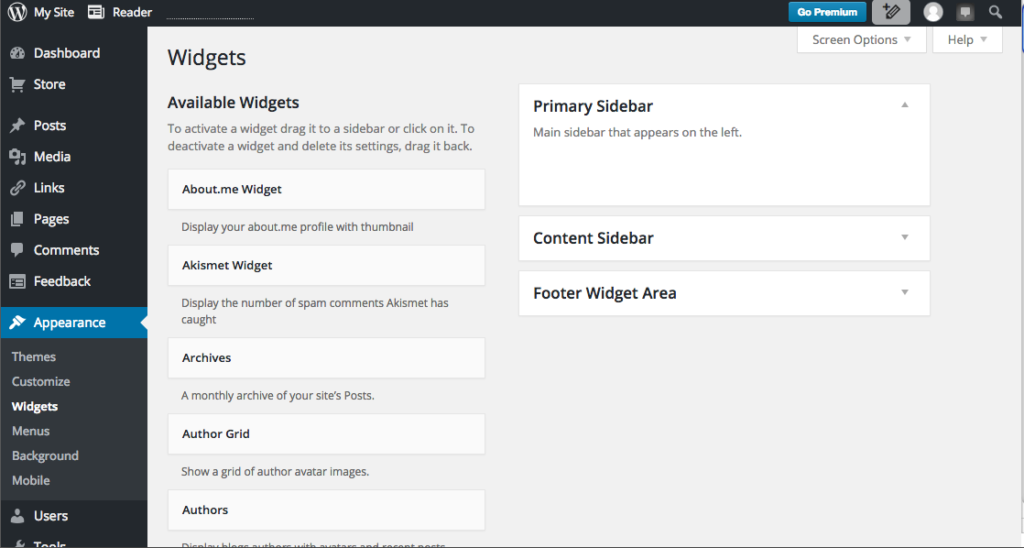
Step 5: Set Up Sidebar Widgets
Go to Appearance / Widgets. A widget is something that inserts a certain functionality (displays a calendar, links to your social handles, a search bar or archived posts, for example). Drag the widgets you’d like your site to have from the left into the sidebar block on the right in which you’d like them to display.
Step 6: Customize Your Theme
You may wish to upload a header image, add a tagline, decide what you’d like to display as the home page and more from this screen. Other things you can do: Under Appearance, you can also enable a mobile-friendly theme (important!) and more.
Step 7: Specify Some Settings
There are many many things you can customize in WordPress–that’s one of its strengths, but don’t let all the options overwhelm you. Under Settings / Sharing you can hook your social accounts into your WordPress site. I also suggest going to Settings / Reading to decide how your blog posts will display and also set the site’s privacy settings. (You might want to make it private while you’re first setting it up.) Finally, under General, you’ll want to add your site title and tagline.
Obviously, there’s a lot more you can do in WordPress, or it wouldn’t be so popular. But if you do just the above and insert your content, plus add blog posts regularly, you’ll have a relatively attractive website and blog from which to showcase your work.
In a future post, I’ll show you how to create a website using a WordPress self-hosted installation.
Elizabeth Mays is the marketing manager for Pressbooks.com. She has built and maintained WordPress websites–self-hosted and not–for other organizations. Her personal Wordpress.com website can be found at elizabethgracemays.com.


